Setup daisyUI CDN Ready For Development
Add the following code to use the full daisyUI CDN while developing, this includes all daisyUI elements. These will be later purged by the Oxywind worker so only the elements you use will be included in your production site.
<?php

function oxywind_daisy_ui_cdn() {

if ( get_option("wakaloka_oxywind_use_css_cache")!="1" || (get_option("wakaloka_oxywind_use_css_cache_except_admin")=="1" AND current_user_can( 'administrator' )) || \defined('SHOW_CT_BUILDER') || !\defined('OXYGEN_IFRAME')){
    wp_enqueue_style( 'daisyui', 'https://cdn.jsdelivr.net/npm/daisyui@2.14.3/dist/full.css', array(), time(), false );
}

}
add_action('wp_enqueue_scripts', 'oxywind_daisy_ui_cdn');


add_filter( 'language_attributes', function( $attr )
{
    return "{$attr} data-theme=\"light\"";
} );


?>
Add daisyUI To Oxywind Worker Configuration
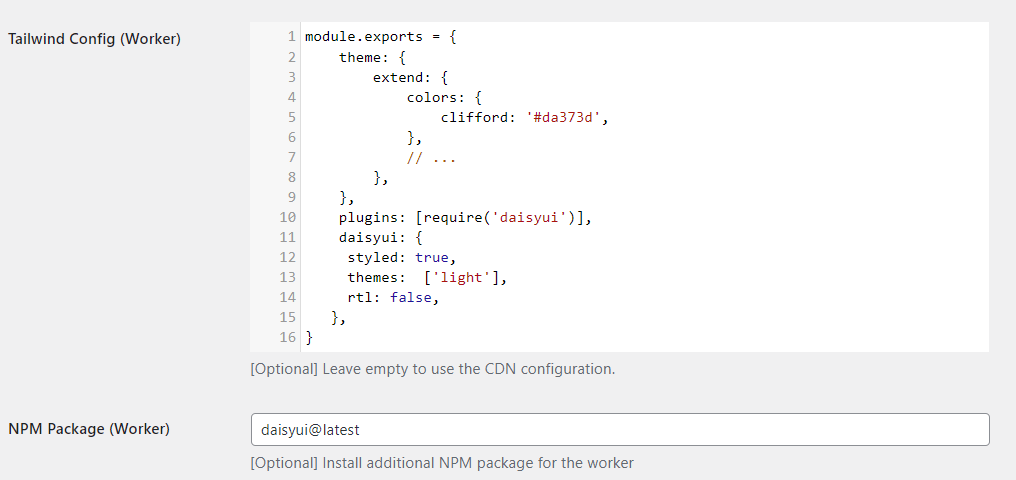
In the Oxywind settings page, add daisyUI into your worker configuration. The worker will purge out unused daisyUI elements when you enable Production Mode. Change theme name in the config as required.
Also add daisyui@latest to your NPM Package (Worker) setting.
module.exports = {
    theme: {
        extend: {
            colors: {
                clifford: '#da373d',
            },
            // ...
        },
    },
    plugins: [require('daisyui')],
	daisyui: {
     styled: true,
     themes:  ['light'],
     rtl: false,
   },
}